Family game nights always present fun, laughter, and a challenge for the competitors amongst us! For avid board game fans, you may be looking at ways in which you can create your own, or even improve an existing game.
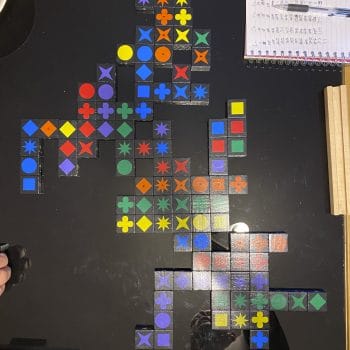
Well why not take inspiration from our customer, Steven Vacher, who’s used over 400 magnets to improve his favorite game, Qwirkle! Qwirkle is a simple game to understand but requires some concentration to score well and win.
Steven’s problem was that the individual pieces when placed weren’t lining up correctly and could be easily displaced causing a lot of in-game carnage at times. Steven’s breakthrough thought to combat this was adding magnets.
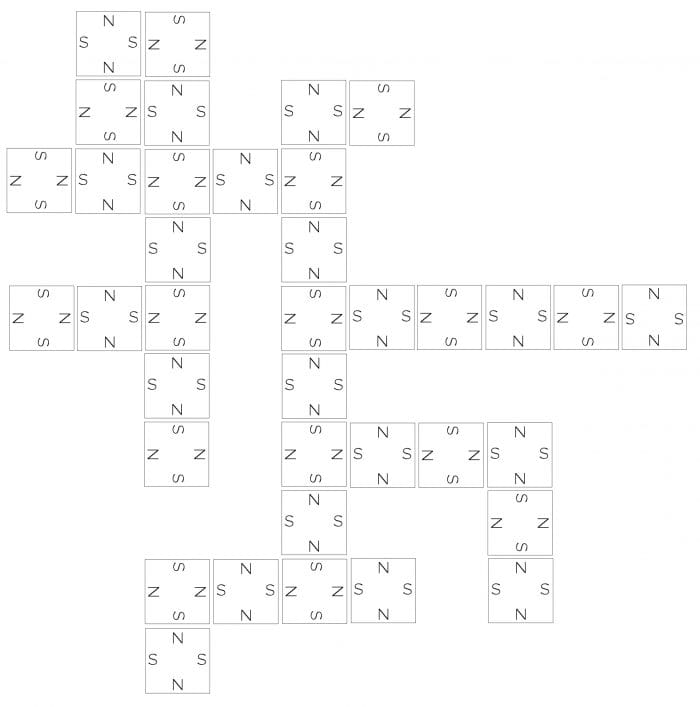
Starting out with a sketch to ensure that the idea was feasible, this showed that no matter the order of placement, a north pole would always line up with a south.
Choosing the correct magnet was the next step for Steven in this project, ensuring the magnets would be strong enough to hold the pieces in place but not too strong that it attracts other pieces and moves the piece.
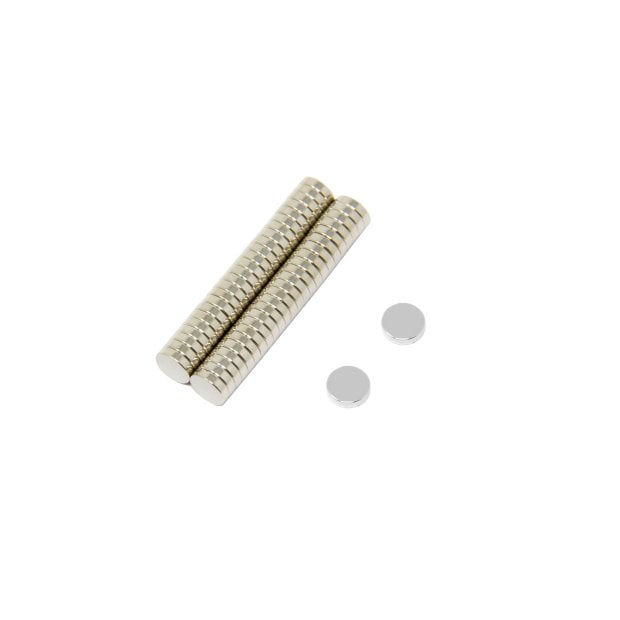
Having measured the pieces, Steven got an idea of what size magnet he required. Steven ultimately chose our 4mm x 1mm N35 Neodymium circular magnets with 0.16kg pull. These neodymium magnets are commonly used in creative applications so were a great choice for Steven’s application.
Having ordered the magnets, it was time for Steven to get to work and with 108 Qwirkle pieces, he needed to router 432 sides. After this, it was time to glue the magnets in place on each piece.
As you can see in the video below Steven followed a six-step process to get each piece finished, before this he aligned all the magnets north to south, allowing him to take off the bottom of the stack and know he was correctly orientated.
Six-Step Procedure:
- Use a match to pick up a spot of epoxy and deposit it in the routed hole.
- Slide a magnet from the bottom of the stack.
- Maintaining the polarisation of the magnet, stick it to the metal stick.
- Place the magnet into the glue. Keeping the angle of the stick low, quickly pull the stick away leaving the magnet in the glue.
- Use a non-metal stick to move the magnet around to make sure it is centralized. At this point try to move some glue to cover up the magnet.
- Move the piece to one side and repeat.
Having glued the magnets, Steven ensured to keep the pieces separate enough to stop them from attracting each other. Steven marked one side of the piece and the opposite side with a yellow dot, both of these sides had the same polarised magnets.
He then turned the magnet stack around to flip the polarization and repeated the process for the other 216 magnets. The whole process took Steven two to three days to glue every magnet.
After every piece was ready and cleaned up Steven decided to test the polarity of the placement of the magnets, as shown below Steven saw both positive and negative results in his testing, thankfully for him only 4 magnets out of 432 were glued wrong.
Having tried and tested each piece it was time for Steven to finally use his invention and play Qwirkle with his family and get some reviews. For a more in-depth view of how Steven made improvements to his favorite game check out his blog post on Instructables.com.
We would like to thank Steven for getting in touch and sharing his story with us, and we think the final result is brilliant! If you are currently working on a project or could use some advice, our team would love to hear from you!